Battery switch on travel trailer function is crucial for safe and efficient power management. Understanding how your battery switch works, where it’s located, and how to troubleshoot problems can save you headaches (and potentially a dead battery) on your next camping trip. This guide will walk you through the different types of switches, their operation, and common issues, empowering you to become a travel trailer electrical system pro.
We’ll cover everything from identifying your switch type and its location to safely turning it on and off, and even troubleshooting common problems like corrosion or faulty connections. Think of this as your handy guide to keeping the lights on (and the fridge cold!) while you’re enjoying the great outdoors.
Battery Switch Types in Travel Trailers

Choosing the right battery switch for your travel trailer is crucial for managing power, ensuring safety, and preventing costly damage. Different types offer varying levels of control and protection, so understanding their differences is key to making an informed decision. This section will Artikel the common types of battery switches found in travel trailers, explaining their mechanisms and comparing their pros and cons.
Single-Pole Battery Switches
Single-pole switches are the simplest type. They control power to a single circuit, typically the house battery. Internally, they use a single switch mechanism to connect or disconnect the battery from the trailer’s electrical system. When the switch is “on,” the circuit is closed, allowing current to flow. When “off,” the circuit is broken, isolating the battery.
This provides basic on/off control, but lacks the more advanced features of other switch types.
Planning a trip? Don’t forget travel insurance! Check out aon travel insurance for comprehensive coverage. They offer various plans to suit your needs, from basic medical to more extensive options. If you’re looking for another provider with similar options, aon travel insurance is also worth exploring; compare quotes to find the best fit for your adventure.
Remember, peace of mind is priceless!
Double-Pole Battery Switches
Double-pole switches offer more control. They usually manage both the house battery and the chassis battery (used for starting the vehicle). Internally, they employ two independent switch mechanisms, one for each battery. This allows for independent control of each battery, meaning you can disconnect one while keeping the other active. This is beneficial for preventing accidental drain on one battery while working on the other.
Disconnect Switches
Disconnect switches, often referred to as battery disconnect switches, are designed primarily for safety. They completely isolate the batteries from the trailer’s electrical system. The internal mechanism is typically a robust switch capable of handling higher currents, and they’re often designed to be easily accessible for quick disconnection in emergencies. These are invaluable for preventing battery drain during storage or in case of a potential short circuit.
| Type | Function | Advantages | Disadvantages |
|---|---|---|---|
| Single-Pole | Controls power to a single circuit (usually house battery). | Simple, inexpensive, easy to install. | Limited control; only one battery managed. |
| Double-Pole | Controls power to two circuits (typically house and chassis batteries). | Independent control of house and chassis batteries; improved safety. | More complex; slightly more expensive than single-pole switches. |
| Disconnect Switch | Completely isolates batteries from the trailer’s electrical system. | Enhanced safety; prevents battery drain during storage; useful in emergencies. | Requires manual operation to reconnect; may not offer fine-grained control. |
Battery Switch Location and Accessibility
Finding your travel trailer’s battery switch quickly can be a lifesaver, whether you’re dealing with a dead battery or need to disconnect power for maintenance. Its location significantly impacts convenience and safety. A poorly placed switch can lead to unnecessary delays and even dangerous situations.The ideal location for a battery switch balances ease of access with safety considerations.
Common locations vary depending on the travel trailer’s design and manufacturer, but understanding the importance of accessibility is key to safe and efficient operation.
Typical Battery Switch Locations
Battery switches are often found in several key areas within a travel trailer. They might be located in a dedicated compartment near the battery itself, often accessible from the outside of the trailer. This external location provides easy access for battery maintenance and disconnection in emergencies, even when the trailer is not connected to shore power. Alternatively, some manufacturers integrate the switch inside a compartment near the tongue of the trailer, often behind a panel.
Others might place it within an easily accessible interior storage compartment, although this is less common due to safety concerns about potential accidental contact. Finally, some less common placements include inside the main electrical panel or even near the propane tank, though these locations are less desirable due to accessibility and safety issues.
So, you’re planning a trip? Awesome! Don’t forget travel insurance! Check out this option for comprehensive coverage: aon travel insurance. They’ve got you covered for medical emergencies and trip cancellations. And if you need another provider to compare, look at aon travel insurance as well; they might have a plan that better suits your needs and budget.
Seriously, getting insured is a total game-changer for peace of mind!
Importance of Accessible Battery Switches
Easy access to the battery switch is crucial for several reasons. Regular battery maintenance, such as checking water levels in flooded batteries or cleaning terminals, requires easy access. In emergencies, a readily accessible switch allows for immediate disconnection of the battery, preventing potential electrical hazards such as short circuits or fires. Quickly disconnecting the battery can be vital in situations involving accidents or potential electrical issues.
Furthermore, accessibility simplifies troubleshooting electrical problems; disconnecting the battery can help isolate problems and prevent further damage.
Safety Hazards of Poorly Located Switches
Conversely, a poorly located or inaccessible battery switch presents several safety hazards. A switch hidden away in a difficult-to-reach location can delay emergency disconnection, potentially leading to a worsening situation. Inaccessible switches can also increase the risk of accidental contact, especially if located near other equipment or in a cramped space. For example, a switch placed near the propane tank could pose a fire risk if accidentally contacted while working on the propane system.
A switch located in a damp or poorly ventilated area increases the risk of corrosion and electrical hazards.
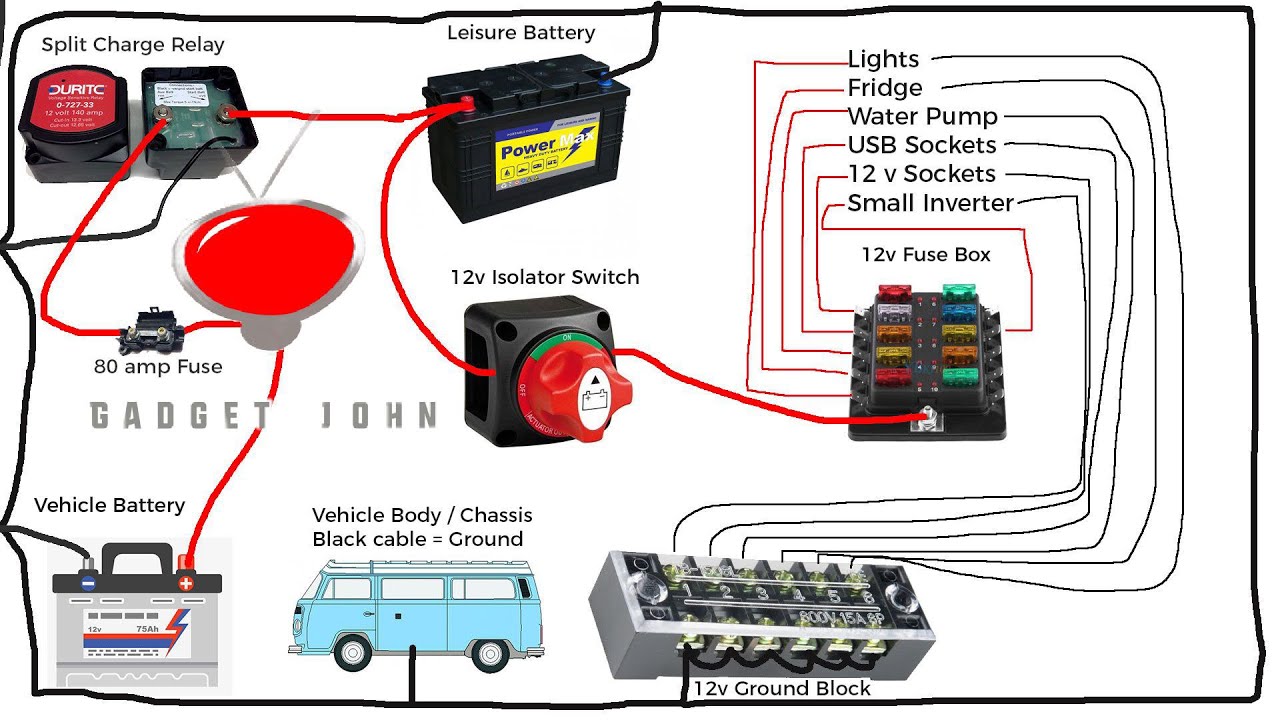
Optimal Battery Switch Placement Diagram
The diagram below illustrates an optimal battery switch placement.[Diagram Description: The diagram shows a simplified side view of a travel trailer. The battery is shown in a compartment at the tongue of the trailer, clearly labeled “Battery.” A clearly marked and easily accessible battery switch is located on the exterior of the trailer, directly adjacent to the battery compartment, but slightly elevated to prevent accidental contact with water or debris.
The switch is labeled “Battery Disconnect Switch” with large, clear lettering. A small access panel is shown, hinged to allow access to the switch. The diagram also shows a clear pathway to the switch, indicating a space free of obstructions. The placement is designed to allow quick access for emergency shutdowns while preventing accidental contact and exposure to the elements.
A distance of approximately 12 inches separates the switch from the battery compartment, providing sufficient space for safe operation.]
Operating the Battery Switch
Properly operating your travel trailer’s battery switch is crucial for maintaining your battery’s health and ensuring the safety of yourself and your equipment. Understanding the procedure and taking necessary precautions will prevent potential problems and extend the life of your batteries.
Operating a battery switch is generally straightforward, but it’s essential to follow a consistent procedure to avoid mistakes. Incorrect operation can lead to damage to your electrical system or even create a fire hazard.
Safe Operation Procedures
Before interacting with any electrical components, always ensure your hands are dry and you’re wearing appropriate footwear. Avoid working on electrical systems in wet or damp conditions. Here’s a step-by-step guide:
- Locate the Switch: First, find your battery switch. Its location varies depending on the travel trailer model, but it’s often near the batteries themselves or inside a compartment accessible from the outside.
- Identify the Switch Positions: Most switches have clearly marked positions, typically “ON,” “OFF,” and sometimes “BATTERY” and “SHORE POWER.” Familiarize yourself with these markings before proceeding.
- Turning the Switch ON: To turn the battery switch on, carefully rotate the switch to the “ON” position. You should hear a click indicating the switch has engaged.
- Turning the Switch OFF: To turn the switch off, carefully rotate the switch to the “OFF” position. Again, you’ll usually hear a click.
Safety Precautions
Safety should always be your top priority when working with batteries and electrical systems. Neglecting safety precautions can lead to serious consequences.
- Disconnect from Shore Power: Before working on the battery switch, it’s recommended to disconnect from shore power to avoid any electrical conflicts or accidental short circuits.
- Wear Protective Gear: Consider wearing safety glasses to protect your eyes from potential sparks or battery acid splashes.
- Proper Ventilation: Batteries produce hydrogen gas, which is flammable. Ensure adequate ventilation around the batteries and the battery switch to prevent gas buildup.
- Avoid Contact with Acid: Be cautious to avoid any contact with battery acid, which is corrosive and can cause serious burns. If acid spills, neutralize it immediately with baking soda and water, and follow proper cleanup procedures.
- Use Insulated Tools: If you need to use tools near the battery or switch, ensure they are insulated to prevent accidental shocks.
Common Mistakes and Their Avoidance, Battery switch on travel trailer function
Several common mistakes can occur when operating a battery switch. Understanding these mistakes and how to avoid them is essential for safe and efficient operation.
- Forgetting to Turn the Switch Off: This can lead to battery drain and potential damage to electrical components. Always turn the switch off when not using the trailer’s 12-volt system for extended periods.
- Forcing the Switch: If the switch feels stiff or difficult to turn, don’t force it. There may be an underlying problem requiring professional attention.
- Ignoring Warning Signs: Pay attention to any unusual smells, sparks, or excessive heat around the battery switch. These could indicate a problem that needs immediate attention.
- Improper Switch Position Understanding: Ensure you understand the meaning of each position on the switch. Some switches have multiple positions, such as “ON,” “OFF,” and separate positions for battery and shore power, requiring careful attention to prevent incorrect configurations.
Battery Switch Operation Checklist
To ensure safe and efficient operation, always follow this checklist:
- Disconnect from shore power.
- Inspect the battery switch for any damage or loose connections.
- Ensure your hands are dry and you are wearing appropriate footwear.
- Verify the switch positions before turning it on or off.
- Operate the switch slowly and smoothly; avoid forcing it.
- After operating the switch, check for any unusual sights, sounds, or smells.
- Reconnect to shore power only after completing all other tasks.
Troubleshooting Common Battery Switch Issues
Your travel trailer’s battery switch is a crucial component, and problems with it can leave you stranded. Fortunately, most issues are relatively easy to diagnose and fix with basic tools and a little know-how. This section will guide you through identifying, diagnosing, and resolving common problems.
Common Battery Switch Problems
Several issues can arise with your travel trailer’s battery switch. Corrosion is a frequent culprit, building up on the terminals and preventing a good electrical connection. Loose connections, either at the switch itself or the battery cables, are another common problem, leading to intermittent power or complete failure. Finally, the switch itself can fail, either mechanically (becoming stuck or broken) or electrically (developing an internal short or open circuit).
Diagnosing Battery Switch Problems
A visual inspection is the first step. Carefully examine the switch and its connections for any signs of corrosion (green or white powdery buildup), loose or damaged wires, or physical damage to the switch itself. Pay close attention to the battery terminals and the points where the cables connect to both the battery and the switch. Look for any signs of melting or burning.
If you find corrosion, loose connections, or damage, that’s likely the source of your problem.
Testing with a Multimeter
For a more thorough diagnosis, use a multimeter. First, ensure your multimeter is set to the continuity test setting (often symbolized by a diode or a “beep” symbol). Touch the probes to the input terminals of the battery switch; a continuous beep or a near-zero resistance reading indicates a good connection. Repeat this test on the output terminals.
If you don’t get a beep, there’s a problem within the switch itself. Next, test the continuity of the cables connecting the switch to the battery. If there is no continuity, you’ve found a break in the wiring. A reading showing high resistance indicates a poor connection likely due to corrosion.
Resolving Battery Switch Issues
Cleaning corroded connections is often the solution. Use a wire brush or a battery terminal cleaner to remove the corrosion from the terminals and the switch contacts. Apply a dielectric grease to the cleaned connections to prevent future corrosion. If connections are loose, tighten them securely. If the switch itself is faulty, replacement is necessary.
Ensure you replace it with a switch of the same type and amperage rating. When replacing the switch, carefully follow the wiring diagram to ensure correct connection. Remember to disconnect the battery before working on any electrical components.
Mastering your travel trailer’s battery switch is key to a smooth and enjoyable camping experience. By understanding its function, location, and potential issues, you’ll be prepared to handle any electrical challenges that arise. Remember, safety is paramount – always follow proper procedures and don’t hesitate to seek professional help if you’re unsure about anything. Happy travels!
Quick FAQs: Battery Switch On Travel Trailer Function
What happens if I leave my battery switch on all the time?
Leaving your battery switch on constantly can drain your batteries, especially if you have parasitic draws from things like interior lights or a radio. It’s best to turn it off when not using the trailer for extended periods.
How often should I check my battery switch connections?
Inspect your battery switch connections at least once a year, or more often if you’re in a humid or corrosive environment. Look for corrosion, loose connections, and any signs of damage.
Can I use a different type of battery switch than what came with my trailer?
Potentially, but it’s best to consult a qualified RV technician or your trailer’s manual. Using an incompatible switch could damage your electrical system or create safety hazards.
My battery switch is stuck. What should I do?
Try lubricating the switch mechanism with a penetrating lubricant. If that doesn’t work, you may need to replace the switch. Again, it’s best to consult a professional if you’re uncomfortable working with electrical systems.
